Crochet Plant Holder Pattern
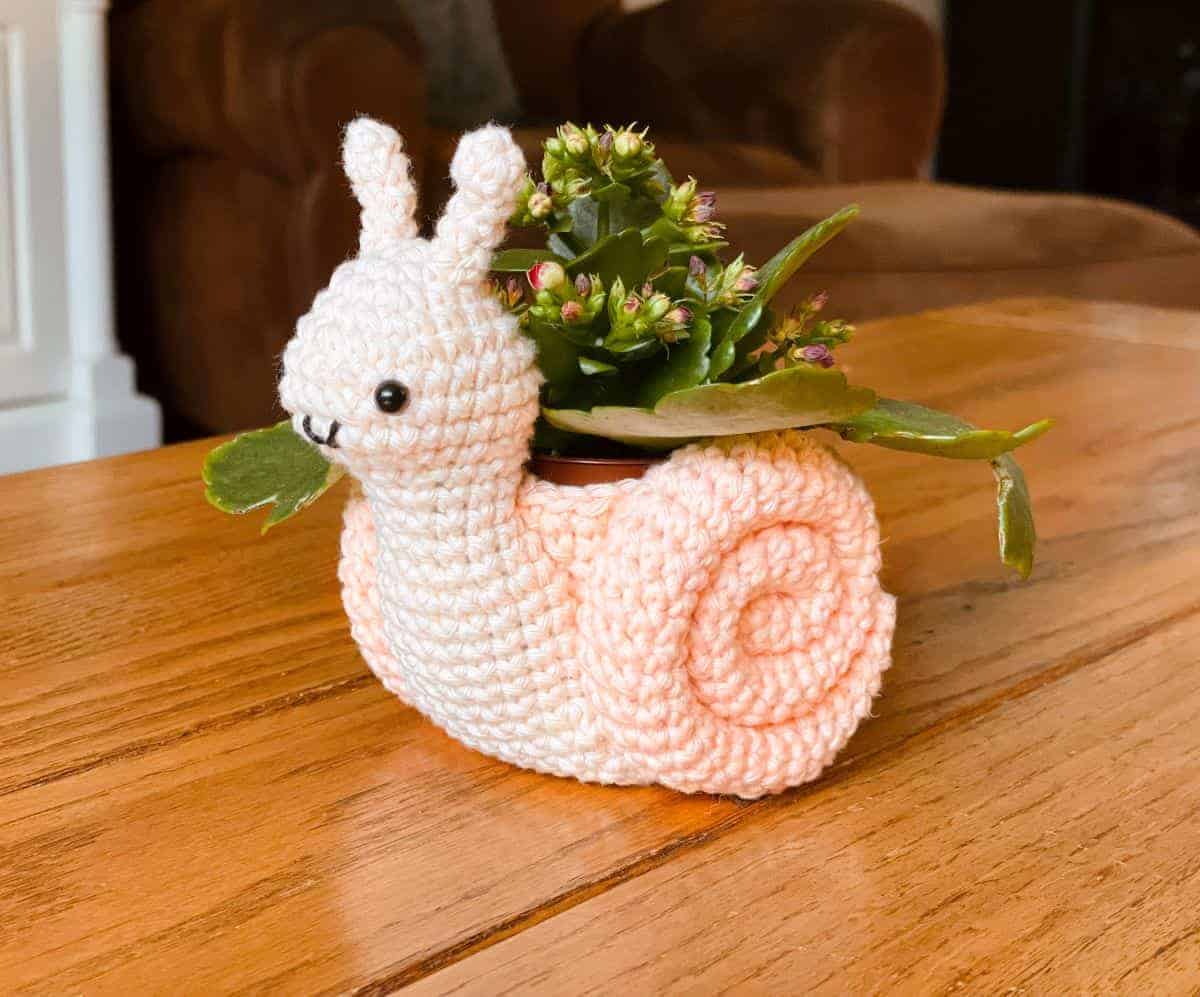
Are you a plant lover? I’ve got the perfect crochet plant holder pattern for you today. And yes, it’s a snail!
I love keeping plants in the house, and although I’ve killed a few, I’ve gotten much better! Plant pot covers can be a fun way to add a little more of your personality around your home.
This snail planter pattern is perfect for the tiny 2″ pots you’ll often find in the floral section of the grocery store, but you can adapt it for larger pots as well.
Snails aren’t always the friendliest to outdoor gardens, but there’s something about them that makes me smile (slugs, not so much). And this amigurumi snail is pretty cute, if you ask me.
This pattern will walk you through making your own pot cover and snail, step by step. Ready to get started?
This post contains affiliate links to products I recommend to my readers. If you click on one of these links and decide you’d like to make a purchase, I will make a small commission (at no extra cost to you).

Crochet Plant Holder Pattern
Materials Used:
- Yarn – Paintbox Cotton Aran in Light Caramel and Peach Orange
- Size G/4.0mm and E/3.5mm crochet hooks
- Stitch marker
- Stuffing
- Safety eyes – size 6mm
- Scissors (for trimming ends)
- Yarn needle (for weaving in ends)
- Embroidery thread in black
Stitches/Abbreviations Used:
- magic ring
- R – round or row
- st/sts – stitch/stitches
- sc – single crochet
- inc – increase (work 2 single crochet stitches into the next stitch)
- invdec – invisible decrease (an alternative to the sc2tog stitch)
- BLO – back loops only
Finished size:
Gauge is not essential for this pattern, but it is helpful to have tight, even stitches.
With my own tension, for reference, the first six rounds of the pot cover measure about 2 1/4″ in diameter, using cotton aran-weight yarn and a size G/4.0mm crochet hook.
The size of your plant pot cover will vary based on your personal tension while crocheting, as well as the yarn and hook you use. For example, acrylic yarn will work up slightly larger than cotton yarn, even at the same yarn weight.
The finished snail planter, once the snail and shells are attached, is about 5″ tall and 4.5″ wide.
Pattern Notes:
This pattern uses continuous rounds. Use a stitch marker to keep your place.
Whenever I’m crocheting in amigurumi style, like the snail in this pattern, I use the yarn under stitch rather than the yarn over. It makes my stitches tighter and gives them the “x” look that I prefer.
If this is unfamiliar to you, I go into a lot of detail about yarning over vs. under in this post, so check it out if you’d like to learn more.
If this crochet plant holder pattern isn’t quite the right size for your plant pot, no problem. You can adjust the size of the pot base by continuing to increase after Round 5, or stopping at an earlier round if the base in the pattern in too big.
Adjust the number of rounds to fit your plant’s base, using multiples of six, then continue up the sides by crocheting in the back loops only and then single crocheting around. This post about increasing circles may help you adjust the size of your base.
You can find an ad-free, printer-friendly version of this pattern on Ravelry or Etsy. The premium version of the pattern includes photo illustrations for each step.
Crochet Snail Plant Holder Pattern:
Pot Cover
R1: Using Peach Orange and size G/4.00mm hook, 6 sc into a magic ring. (6)
R2: Inc in each st around. (12)
R3: (Sc, inc) 6x around. (18)
R4: (2 sc, inc) 6x around. (24)
R5: (3 sc, inc) 6x around. (30)
If you are adjusting this pattern to accommodate a larger pot, continue increasing at this point until you’ve achieved the size needed (see Pattern Notes).
R6: In BLO, sc in each st around.
R7-R12: Sc in each st around.
R13: (4 sc, inc) 6x around. (36)
R14-R15: Sc in each st around.
Fasten off, weaving in ends. Set aside.
Antennae (make 2)
R1: Using Light Caramel and size E/3.5mm hook, 5 sc into a magic ring. (5)
R2: Sc in each st around.
R3: Invdec, 3 sc. (4)
R4-R5: Sc in each st around.
Fasten off, leaving long tail. Set aside.
Snail
R1: Using Light Caramel and size G/4.00mm hook, 6 sc into a magic ring. (6)
R2: Inc in each st around. (12)
R3: (3 sc, inc) 3x around. (15)
R4: (4 sc, inc) 3x around. (18)
R5: (2 sc, inc) 6x around. (24)
R6-R8: Sc in each st around.
R9: 3 sc, 1 invdec, 3 sc, 4 invdec, 3 sc, 1 invdec, 3 sc. (18)
R10: 6 sc, 3 invdec, 6 sc. (15)
Attach safety eyes between rounds 6 and 7, about 6 sts apart.
Using black embroidery thread, embroider two lines that meet to form a mouth shape, pictured at rounds 7 and 8. Tie beginning and ending tails of thread together and stuff inside head.
To add the antennae (technically called tentacles on a snail, if you can believe it), use your yarn needle and the long tail left after the last antennae round. Attach on top of head, at rounds 2-3, then weave in ends inside head.
Stuff the head and neck as you go on (but only stuff neck through about round 20, then stop stuffing).
R11-R13: Sc in each st around.
R14: (4 sc, inc) 3x around. (18)
R15-30: Sc in each st around. Stop stuffing at Round 20
R31: (4 sc, invdec) 3x around. (15)
R32: (3 sc, invdec) 3x around. (12)
R33: (2 sc, invdec) 3x around. (9)
Fasten off, using yarn tail and yarn needle to weave through front loops of final round of stitches. Pull together and weave in end.
Snail Shell (make 2)
R1: Using Peach Orange and size G/4.00mm hook, sc 6 into a magic ring. (6)
R2: (Sc, inc) 3x around. (9)
R3-R57: Sc in each st around. Stuff very lightly as you go.
Fasten off, leaving very long tail.

Putting It All Together
Once you have crocheted the pot cover, snail, and two spirals for the shell, it’s time to sew everything together so you can add your plant.
Step One: Sewing the Snail to the Pot Cover
First, cut a long length of yarn in Light Caramel. The snail will be sewn to the pot cover, with its head sticking out above it and the flat end of its body underneath.
Place the snail along the pot as described above, then bring your yarn needle from inside the pot outward, sewing the snail to the pot along the top of the pot and along where the back of the snail and the pot meet.
Then, continue to sew the flat bottom of the snail’s body to the bottom of the pot. Once the entire snail is attached, weave in your ends.
You’ll notice that without any weight in the pot cover, the snail tips forward, but once you put a plant inside it will stay upright.
Step Two: Winding the Shells
Thread the long tail from the end of the shell (which looks like a tube) onto your yarn needle. Sew end of tube closed.
Wind tube up counterclockwise into a tight shell shape. Secure this shape by weaving your yarn needle from one side of the shell to the other. Try to weave well into the middle of the stitches so the yarn doesn’t show.
Repeat this along multiple points so the shell keeps its shape. Do not cut yarn tail or weave in.
Repeat with second shell.
Step Three: Sewing the Shells to the Pot Cover
Place one shell on one side of the pot, matching up the top of the shell with the top of the pot cover.
Using your yarn needle and remaining yarn tail (or cut new length of yarn as needed), first sew the top of the shell to the top edge of the pot cover to match them up, then sew around the perimeter of the shell, attaching securely to the pot cover.
Repeat on other side. Weave in all remaining ends.
Step Four: Add a Plant!
Once you’ve got your snail and shells added to your pot cover, it’s time to add a plant. Then you can keep this sweet snail on a kitchen windowsill, an office desk, and give it as a springtime gift to a friend.
It’s sure to make people smile (the snail planter pictured in this blog post was quickly adopted by my tween daughter)!
I hope you enjoyed making your crochet plant holder with this free pattern. If you’re looking for more free patterns, take a look around here!
No time to crochet your pot cover today? Save it on Pinterest for later!

© 2026 Crochet to Play
All rights reserved. Designed and written by Jennifer Percival. This pattern is property of Crochet to Play. The written pattern and images are for personal use only. Please do not redistribute, transfer, or sell the pattern or images, in part or in whole. Thank you.
