Crochet Pine Cone Pattern
Not so long ago, I was shopping the aisles of my favorite craft store and noticed the cutest pine cone decorations tucked into a shelf. Even though they weren’t made of yarn, I instantly thought, I want a crochet version of those! So I added “crochet pine cone pattern” to my to-do list of future designs.
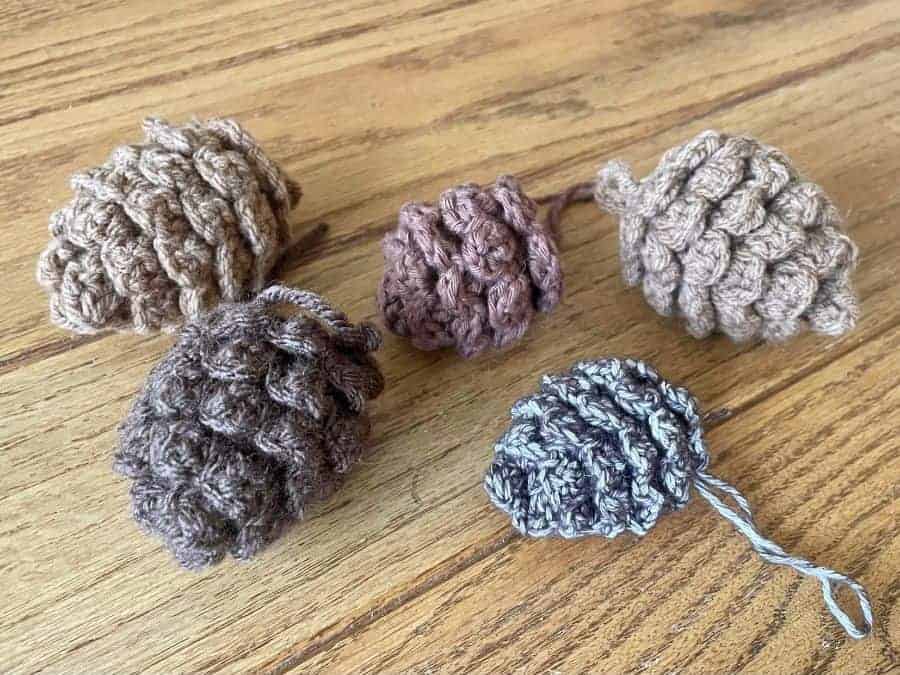
Once I was able to get to work on these, I experimented until I got a pine cone shape I liked. I tried different yarn weights and hook sizes and got all kinds of different results. The pine cone pattern shared here is my favorite of the bunch. It uses worsted weight yarn and a size E/3.5mm hook. However, you can use lighter weight yarn and a smaller hook for smaller pine cones.
The pattern does have a special stitch I’m calling the prickle stitch. I promise, it looks more complicated than it us! Just make sure to read through the entire pattern and the notes before starting and you’ll be all set. Let’s get started!
This post contains affiliate links to products I recommend to my readers. If you click on one of these links and decide you’d like to make a purchase, I will make a small commission (at no extra cost to you).
Crochet Pine Cone Pattern
Materials Used:
- Yarn – worsted weight in preferred shade of brown (yarn pictured is Yarn Bee’s Yarn ID in Café Au Lait)
- Size E/3.5mm crochet hook
- Yarn needle (for weaving in ends)
- Stuffing
Stitches/Abbreviations Used:
- ch – chain
- R – row
- st/sts – stitch/stitches
- magic ring
- sc – single crochet
- sl st – slip stitch
- inc – increase (work 2 single crochet stitches into the next stitch)
- sc2tog – single crochet 2 together
- BLO – back loop only
- yo – yarn over
- Prickle stitch – yo, insert hook, yo and pull up a loop, yo and pull through 2 loops (2 loops remaining on hook), yo, insert hook into same stitch, yo and pull up a loop, yo and pull through 2 loops, yo and pull through all 3 loops remaining on hook
Finished Size:
Each finished pine cone measures about 3″/7.5cm in length.
Pattern Notes
The pine cones are made in two parts. First, you’ll crochet the inner pine cone shape, with some rounds worked only in the back loops. Then, you’ll make the pine cone’s “prickles”, working into the remaining front loops from the earlier rounds.
Inner Pine Cone Shape
R1: 6 sc into a magic ring. (6)
R2: Inc in each st around. (12)
R3: In BLO, (sc, inc) 6x around. (18)
R4: Sc in each st around.
R5: In BLO, sc in each st around.
R6: Sc in each st around.
R7: In BLO, sc in each st around.
R8: Sc in each st around.
R9: In BLO, sc in each st around.
R10: (Sc, sc2tog) 6x around. (12) Stuff the inner pine cone.
R11: In BLO, sc in each st around.
R12: Sc2tog 6x around. Then, remove stitch marker and complete two additional sc2tog. (4) Do not fasten off.
Pine Cone “Prickles”
With the last loop from the last stitch still on your hook, (ch 2, prickle st in next st, ch 2, sl st in next st) 2x around, using the 4 sts remaining from R12.
Now we need to “jump” down to the next round of front loops to work into. To do this, we’ll work one prickle stitch sequence into a post stitch of the round below.
Ch 2, turn and work into a post of R12 directly below current loop on hook (see photo below): (Prickle st, ch 2) 1x.
Sl st into front loop of R11 directly below. Even though this prickle is sideways, it blends in with the others in the end.

Hold pine cone upside-down for the remainder of the pattern.
Working into front loops remaining from R11: (Ch 2, prickle st in next st, ch 2, sl st in next st) 6x around.
You may notice, due to working in the round, that the front loops remaining meet with a slight gap where the round begins/ends- just crochet right over it.
Ch 2, turn and work into post of R10 directly below current loop on hook: (prickle st, ch 2) 1x. Sl st into back loop of R9 directly below.
Working into front loops remaining from R9: (Ch 2, prickle st in next st, ch 2, sl st in next st) 9x around.
Ch 2, turn and work into post of R8 directly below current loop on hook: (prickle st, ch 2) 1x. Sl st into back loop of R7 directly below.
Working into front loops remaining from R7: (Ch 2, prickle st in next st, ch 2, sl st in next st) 9x around.
Ch 2, turn and work into post of R6 directly below current loop on hook: (prickle st, ch 2) 1x. Sl st into back loop of R5 directly below.
Working into front loops remaining from R5: (Ch 2, prickle st in next st, ch 2, sl st in next st) 9x around.
Ch 2, turn and work into post of R4 directly below current loop on hook: (prickle st, ch 2) 1x. Sl st into back loop of R3 directly below.
Working into front loops remaining from R3: (Ch 2, prickle st in next st, ch 2, sl st in next st) 9x around.
Fastening Off
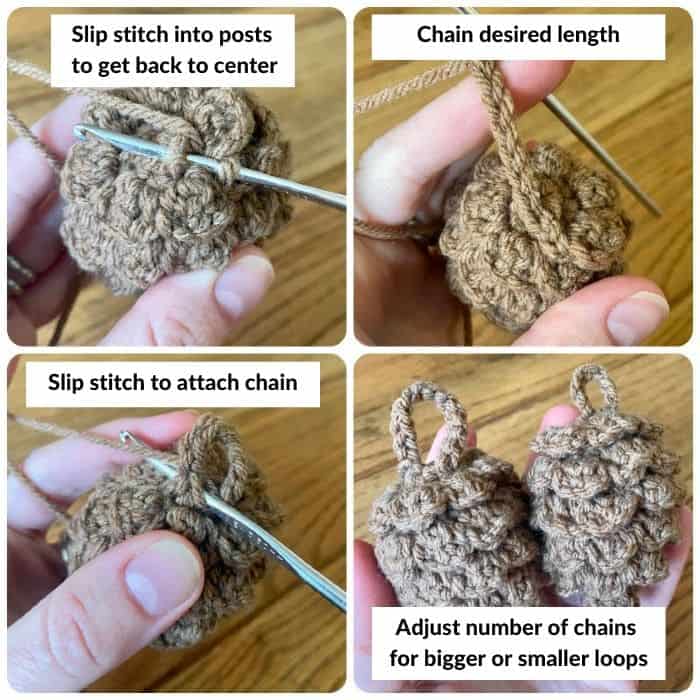
Now, depending on how you plan to use your pine cone, you can fasten off in a couple of different ways. The first option is to create a loop for hanging the pine cone. To do this, with the last loop still on your hook, sl st into the posts of rounds 1 and 2. This gets your hook to the center of the pine cone. Then chain the length of the loop you want, and slip stitch again into the center to attach the loop. Then you can fasten of by pulling through, cutting the yarn, and weaving in the end.
Another option is to just fasten off from the last stitch, pull through and leave a long end. If you’re planning to make a number of pine cones to turn into a garland, you could use this method and then use the yarn ends to attach the pine cones to a chain.
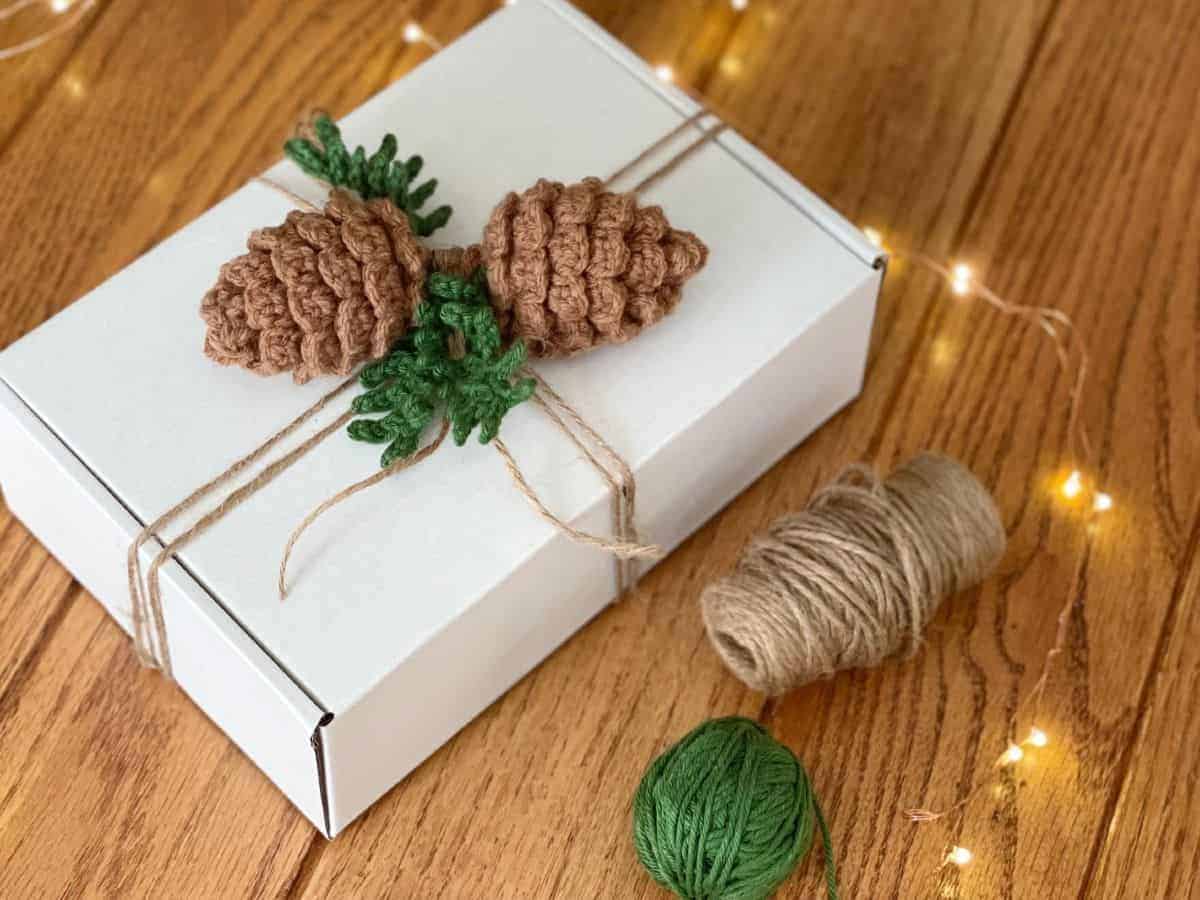
Adding Greenery
Now, you also might want to add pine needles to your pine cones (as shown in the main photo). If so, you’ll want to check out this pattern. I made a few length of this greenery, then sewed it to the top of each pine cone to finish them up.
If you’re searching for more ways to embellish gifts with yarn, check out this video by Ophelia Talks. And if you’d like to see more free Crochet to Play patterns, head here.
So, how will you use this crochet pine cone pattern? Try it for garlands, gift toppers, ornaments and more. Let me know in the comments what you like best!
Save this idea on Pinterest for later!

© 2026 Crochet to Play
All rights reserved. Designed and written by Jennifer Percival. This pattern is property of Crochet to Play. The written pattern and images are for personal use only. Please do not redistribute, transfer, or sell the pattern or images, in part or in whole. Thank you.
My fiance is obsessed with pinecones, they’re her most favorite thing in the world, and plushies are a close second. But the biggest plushie pinecone I could find on the market is a dog toy, and still too small to cuddle. I decided she NEEDED one regardless and resolved to make it myself.
After a successful run with regular yarn currently dangling from her rearview mirror, I gave this pattern a shot with extra thick blanket yarn.
It turned out pretty good! A little wonky, but that’s got more to do with my experience being limited to 2 Woobles.
I looped some smaller yarn to tie down the slip stitches since the thickness blurs the separation of the prickles.
Thank you for helping me bring this to life! It might be her favorite surprise ever ❤️
https://imgur.com/a/1co9898
That’s amazing! I’m so glad you were able to adapt this pattern to be the perfect gift for your fiancé! 🙂
I love your pattern. I have been making them with Crochet thread size 10 and 1mm hook. So many people do a double take that they are actually crochet.
I bet they look amazing! Glad you’re enjoying the pattern!
I love this and will be making a few to add to a crocheted Autumn wreath I’m making. This is perfect and very clear instructions, even though I used better with video. Many thanks.
Great idea! Glad the pattern can add to your project. 🙂
Thank you for this pattern, it is really great and the outcome is so cute! However I sadly have a problem with working the pickles into the front loops. I have trouble finding the stitch I have to work into. I think I probably crocheted it too tightly. Do you might have another idea or tip for me?🥰
I am often a tight crocheter so I get this! I recommend sizing up a hook size or two when making the inner pine cone, then sizing back down for the outer pine cone. Hope that helps!
easy to follow pattern, lovely autcome. thanks!
do you have a video tutorial on how to do the prickle stitch? i can’t seem to figure it out!
I’m sorry, I don’t have video support for my patterns. Maybe someday though!
When you are making your inner pine cone, do you slip stitch after every round to join or is it continuous?
I worked in continuous rounds but it’s just preference for this pattern. It makes no difference to the final outcome. 🙂
This is a great pattern! So sweet! Now you mentioned stuffing in your supplies list, at which point are you stuffing the pinecone? So excited to make a few dozen of these.
Thank you! You start stuffing at round 10 of the inner pine cone.
I’m using the pine cones with some crochet poinsettas and greenery to make a christmas wreath
What a great idea!