Crochet Granny Heart Pattern
Have you heard of cottagecore style? This vintage aesthetic is romantic and cozy, and very popular right now. If you love this style, then you’ll love this free crochet granny heart pattern!
Crocheting these hearts for Valentine’s Day is a sweet way to add that handmade, nostalgic touch to your home. Whenever I put up crochet decorations around my house, I always think about my grandma (and her intricate doilies!).
This crochet granny heart pattern works up so quickly and is easy to make into all kinds of different projects. You can make multiple hearts and string them up as a garland, use them as Valentine coasters, or even applique onto another project like a blanket. Ready to get started?
This post contains affiliate links to products I recommend to my readers. If you click on one of these links and decide you’d like to make a purchase, I will make a small commission (at no extra cost to you).

Free Crochet Granny Heart Pattern
If you’ve ever crocheted granny squares, you’ll pick up this pattern in no time. You’ll love the way these crochet hearts are granny-square inspired but look fresh and modern too!
Materials Used:
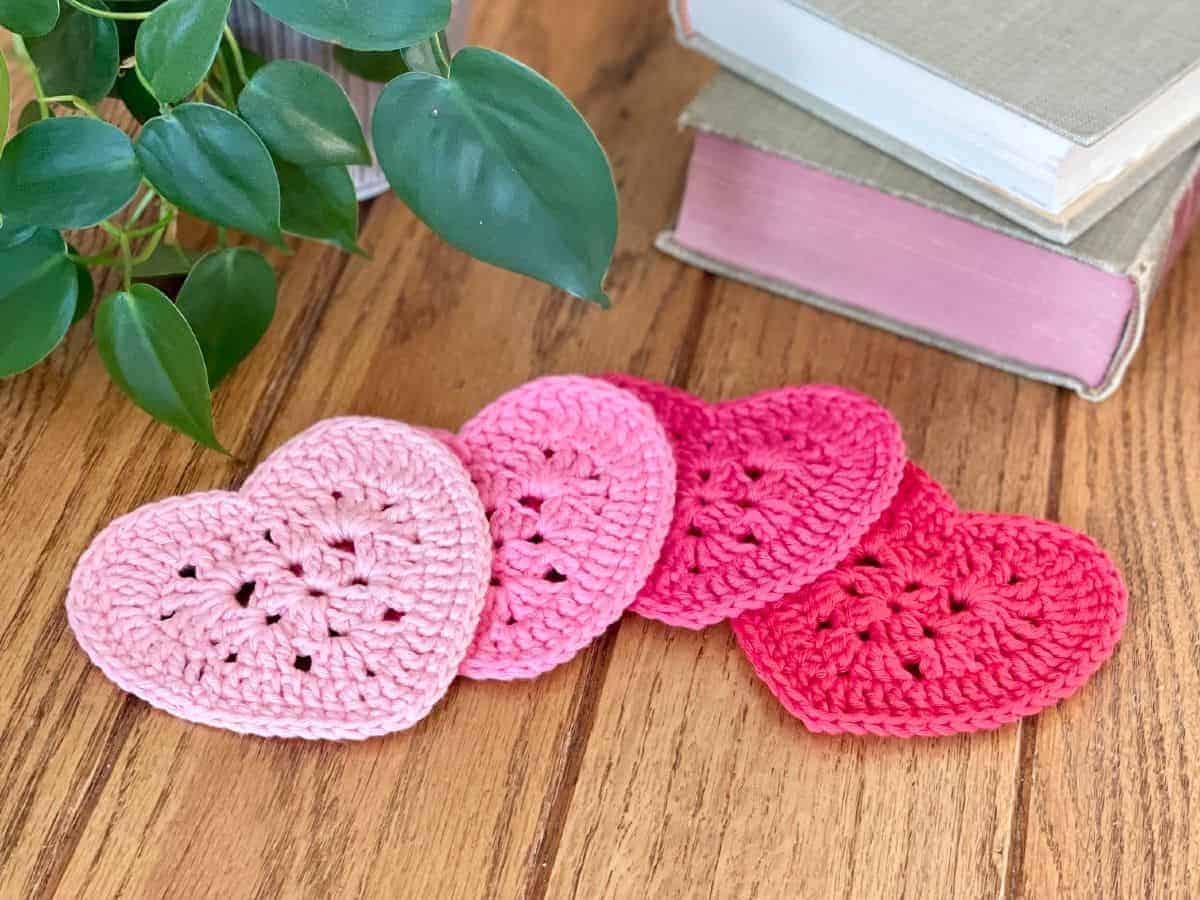
- Yarn – any worsted weight yarn will do! The hearts pictured were made with Paintbox Cotton Aran (colors pictured: Blush Pink, Bubblegum Pink, Lipstick Pink, Pillar Red)
- Size E/3.5mm crochet hook
- Scissors (for trimming ends)
- Yarn needle (for weaving in ends)
- Blocking board and pins (optional)
Stitches/Abbreviations Used:
- R – round or row
- st/sts – stitch/stitches
- ch -chain
- ch-sp – chain space
- sl st – slip stitch
- sc – single crochet
- dc – double crochet
- hdc – half double crochet
- tr – triple crochet
Finished Size:
The hearts pictured measure about 4.25″ across and 3.75″ from top to bottom (using a size E/3.5mm hook and cotton yarn). Your hearts’ size will vary based on your personal tension while crocheting, as well as the yarn and hook you use.
Pattern Notes:
Some crocheters flip their work from front to back with each round of a granny square. I did not turn my work over with this pattern – all rounds are worked with one side as the front and one side as the back.
Chain stitches count as double crochets (and are always marked in the pattern).
You can use any yarn you like for this pattern, but your results will vary a bit depending on the fiber you choose. I love the way these granny hearts look made in cotton yarn because of its crisp definition. Acrylic or wool yarns will give you a less defined, softer look.
I made the hearts pictured here in various shades of pink and red for a bit of an ombre effect. You could try making yours in light pastels, classic Valentine’s red, pink, and white, or even using white for the final round, like a valentine trimmed with a doily – remember those?
Finally, blocking isn’t essential for this pattern, but I find it makes the hearts lie flatter and relaxes the stitches enough to show more definition. Specific blocking directions can be found at the end of the pattern.
You can find an ad-free, printer-friendly version of this pattern on Ravelry or Etsy. The premium version of the pattern includes photo illustrations for each step.
Granny Heart Pattern:
Chain 5 and sl st to form a ring.
Round 1
Ch 3 (counts as first dc).
Into the ring, work 2 dc, ch 2.
Then, (3 dc, ch 2) 3x into ring.
Sl st into top of beginning ch 3 to join.
Round 2
Sl st across tops of sts (2 dc from previous round) to first ch-sp. Sl st in ch-sp.
Ch 3 (counts as dc).
Into the first ch-sp, work 2 dc, ch 2, 3 dc, ch 1.
Then, (3 dc, ch 2, 3 dc, ch 1) in next three ch-sp.
Sl st into top of beginning ch 3 to join.
Round 3
Loosely sl st in the next 4 sts (into 2 dc, a ch-sp, and the next dc from the previous round).
Skip next 2 sts, then (2 tr, ch 1, 2 tr, ch 1, 2 tr) into next ch-sp.
Skip next 2 sts (2 dc from previous round) and sc in next 3 sts (into 1 dc, a ch-sp, and the
next dc from the previous round).
Skip next 2 sts (2 dc from previous round), then (2 tr, ch 1, 2 tr, ch 1, 2 tr) in next ch-sp space.
Skip next 2 sts (two dc’s from previous round), then slip st in top of dc.
Leave remaining sts of this round unworked.
Round 4
Ch 3 (counts as dc).
8 dc down one side, 2 dc in bottom ch-sp, then 9 dc up other side.
Then, 2 dc in each of next 3 sts, 2 tr in each of next 3 sts, 2 dc in next st, hdc in next st,
sc in next st. This completes the first curved “peak” of the heart.
Sl st where the low point between “peaks” will be.
Then, sc in next st, hdc in next st, 2 dc in next st, 2 tr in each of next 3 sts, 2 dc in each of
next 3 sts.
Sl st into top of beginning ch 3 to join.
Round 5
Ch 1. Sc around entire heart, with 2 sc at the bottom point of the heart, and 1 sl st at top of the heart in the middle of the two curves.
Fastening off
To fasten off, you can sl st into the top of the beginning ch 1. Alternatively, you can try the “invisible finish” method.
To do this, after completing the last stitch of your last round, do not slip stitch. Pull yarn a few inches through the last stitch and cut the yarn. Thread it onto your yarn needle.
Skip the next stitch. Then insert your yarn needle from front to back into the following stitch (threading the yarn needle under both the front and back loops of this stitch).
Next, bring your yarn needle up and insert it between the front and back loops of the last stitch of the final round. Finally, pull the yarn through from front to back until it resembles a stitch (don’t pull too tightly but don’t leave it too loose either). The invisible finish method is pictured at the bottom of this blog post.
Weave in all your loose ends securely on the backside of the heart and trim.
Finishing Up
Blocking:
While blocking isn’t essential for this pattern, I find it relaxes the stitches a bit and helps the hearts to lie flatter.
To do this, first get the hearts wet (I use a spray bottle but you can fully soak them if you prefer). Then, pin them to a blocking board, very slightly stretching the hearts into their proper shape. If your blocking board has grids, you can use the lines to pin each heart evenly.
Once the hearts are completely dry, unpin them and they’ll be ready for use!

Garland Instructions:
If you’d like to make your hearts into a granny heart garland, first start by crocheting a chain to the length you would like your garland to be.
Next, to make loops on the ends of your chain, sl st in the 7th ch from your hook. Fasten off, weaving in that end. Then, use your beginning yarn tail to make a loop at the other end of the chain, weaving in that end as well.
Lastly, weave the chain through the tops of your hearts, as pictured below. Hang and enjoy!

And there you have it! I hope you love your finished result. What will you do with your hearts?
If you liked this free granny square heart pattern, try some of these free Valentine crochet patterns too!
No time to crochet today? Save to Pinterest for later!

© 2026 Crochet to Play
All rights reserved. Designed and written by Jennifer Percival. This pattern is property of Crochet to Play. The written pattern and images are for personal use only. Please do not redistribute, transfer, or sell the pattern or images, in part or in whole. Thank you.