
How to Crochet a Chain
This post contains affiliate links to products I recommend to my readers. If you click on one of these links and decide you’d like to make a purchase, I will make a small commission (at no extra cost to you).
When you begin to crochet, one of the first skills you’ll want to learn is how to crochet a chain. Chain stitches form the foundation of many crochet projects – so much so, they’re often called “foundation chains.”
Foundation chains are used all the time in crochet. They begin items that are flat and worked back and forth in rows. Chains can also be joined into a circle to make items worked in the round. Since this is such an important beginner crochet skill, let’s get you chaining!
You don’t need much to get started – just yarn and a hook. I recommend beginning with worsted weight yarn in a lighter color (darker colors make it harder to see each stitch), and a size I/5.50mm crochet hook. Of course, if you have different yarn or a different hook size, don’t let that stop you!
Steps to Crochet a Chain
Step 1: Begin with a Slip Knot
A slip knot is the method we use in crochet to “attach” the yarn to the hook. To make a slip knot, wrap the yarn in a circle, overlapping as pictured. Insert your hook into the center of the circle, then use it to hook the yarn and pull it through the circle. Tighten the circle (by pulling the loose yarn end) onto the shaft of the crochet hook.

Step 2: Crochet Your First Chain
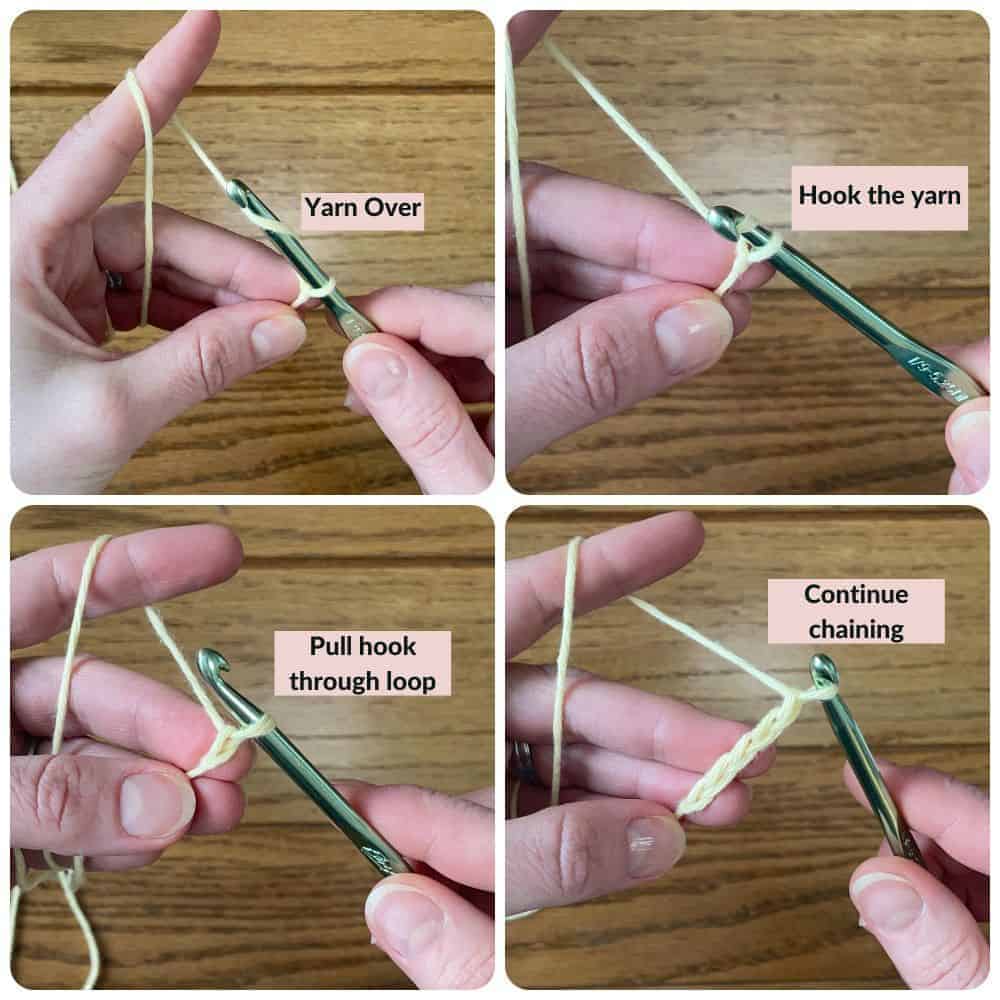
Your slip knot has left you with one loop around the shaft of your crochet hook. Guiding the yarn with your other hand, wrap the yarn around your hook as pictured (this is called a “yarn over”). Now, while the hook is wrapped with this yarn, pull the hook through the loop. This is one chain stitch.
Step 3: Repeat for the Number of Chains Needed
When you’re practicing chain stitches, you can go and go and make as many as you want! If you’re following a pattern, it will tell you how many chains to crochet. For example, it might say “Chain 16” or use the abbreviation “Ch 16”. This means you will chain 16 times. The remaining loop on your hook does not count as a chain.
Step 4: Learn to Count Your Chains
If you have a set number of chains to make, you want to know that you’re counting them accurately. When the chain is facing up, you will see each stitch as a sideways “v”. Each “v” is counted as one chain. In the photo below, there are 11 chain stitches that you can see marked.

Pro Tips
While chaining is not the most complicated crochet stitch, that doesn’t make it a piece of cake when you are first learning! Here are some tips to help make it a little easier (keep in mind I am right-handed):
Make sure you know what each of your hands is doing. Your left hand should be guiding the yarn and keeping the chain steady, while your right hand is holding the hook and performing each stitch.
Use your thumb and middle finger on your left hand to secure the slip knot when you start, and then the chain as you go. I pinch the chain in this way as I go because it prevents the chain from twisting. It can also prevent the previous chain from tightening as you make the next chain.
Remember that chain stitches are the first step in a project, which means eventually other stitches will be worked into the chain. Tight chains can be very difficult to work into, so it’s well worth it to experiment with your tension. Depending on how tightly you hold your yarn as you work, your chain can become tighter or looser. Practice making semi-loose, even chains.
Ready for more?
If you’ve practiced chain stitching and are ready for the next step, I have lots of resources to help you grow your skills. Click here to learn how to begin crocheting into your chain with the single crochet stitch. And if you’re looking for more help learning how to chain, check out this helpful video by Bella Coco Crochet.
I hope this tutorial was helpful as you learn how to crochet a chain. Let me know if you have any questions in the comments and I’d be happy to help you out!
Want to keep this tutorial as a reference? Save it to Pinterest!

© 2023 Crochet to Play
All rights reserved. This blog is property of Crochet to Play. The writing and images are for personal use only. Please do not redistribute, transfer, or sell the writing or images, in part or in whole. Thank you.